Archive | June 2012

Appliqued Wall Hanging

I started quilting 15 years ago when my son left for the service. I’d been a sew-er since I’d been about 12, but had never quilted. It just seemed too ‘grandma-ish’ so I kept putting it off.

The time had come though! I took over his empty room, filling it with all my sewing equipment that had been set up in a corner of the family room. I moved in all my fabric and accumulated stuff, and his room became my sewing room (much better than looking at his empty bed!). My first project was a quilt for him – I wanted to send him something special and personal,  so I made him a bed-size quilt that he used as he moved from place to place.   He still has it and uses it, so it was a definite success!

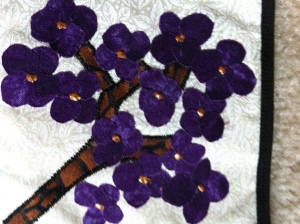
My second project was something for me. I had seen so many beautiful appliqued wall hangings and I wanted to try one. I decided to do a flower ‘sampler” of sixteen different flowers.  The following picture shows the finished sampler, each machine appliqued.

I started the project by cutting a piece of off-white fabric 24″ x 24″, which was bigger than the finished project would be.  I folded the fabric until I had 16 equal sized squares, and ironed until I could see creases in the fabric.  Those creases helped me center the flower in each square.  Then the fun began!!

I selected colorful but realisitic fabrics for each flower, making sure that there was nice contrast.  In order to ‘build’ the flowerI started at the ‘bottom’ and worked out to the outer-most piece – just kept building one piece on top of the other. I used fusible web to attach the pieces of fabric to the white fabric base and then machine zig-zag stitched around the edges.

Appliqued CarnationAppliqued Lilac


Each flower was centered in the ironed square and when it was finished there were 16 flowers on the white fabric base.  In order to finish the wall hanging, I cut out a matching piece of white fabric and placed it right side down, the batting in the middle, and the flowers on top.  The ‘sandwich’ was then ready to finish.  I zig-zagged  top to bottom between each flower row, and then across, creating frames for each flower.  Then I zig-zagged around the entire picture finishing it off.


My patterns came from Better Homes & Gardens 501 Quilt Blocks.  It’s chock full of applique patterns, as well as traditional and paper piece quilt blocks. 

What project do you look back on and remember fondly?   I’d love to hear about it – leave a comment about it, okay?

Organizing the Fabric Stash

As you know, we recently relocated from Oregon.  Of course, I brought along ALL my sewing equipment, fabric and miscellaneous tons of related ‘stuff’!  When we moved into our house, I set up my sewing studio quickly in order to continue sewing for our business, She and Me Designs.

Unfortunately, my fabric stash started creeping out of its boxes and redistributing itself all over every surface of my studio!  Within minutes, it took over!!!

Sewing room cleanup

Although I’m definitely not a ‘neatnik’, I also can’t stay focused when everything is too disorganized and messy (it’s a fine line, I know).  It was time to corral all the stuff and get it into a place where it belonged and I could see what I had.  Hence, a trip to Target.  We got SO lucky –

Target had bookshelves on sale last week, and I took several of the short (on sale for $16!) and several tall (on sale for $26!) basic white bookshelves.  The short ones fit perfectly against a short stair wall, and the talls ones work perfectly on the opposite wall!   SCORE!!!   I’ll probably add a couple more short ones at a later date, but for now this is perfect!

Target Bookcase    Target bookcase

As you can see below, I’m totally organized now.  I’m sure as projects get going things will start creeping out again, but at least now I have a place to put it all back and get it under control again.  That’s what it’s all about – controlling the mess so you can be free to be creative!!!!!

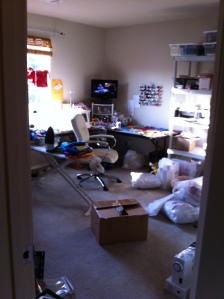
I love that my fabric is now organized – here’s a look at the rest of the room!

What have you done lately to help yourself be organized?  I’d love to hear about your projects.

Mr. Lion’s New Pants!

Mr. Lion needs some pants, Nana.  Can you  make some?” Sweet asked with an imploring look!

 Well, what Nana with a sewing machine can deny such a request???  So, we took a few minutes to make Mr. Lion some new pants.  Not ‘fancy pants’, just good ole every-day pants.  Since I didn’t have a pattern handy for Mr. Lion-size pants, I had to wing it.  I found a remnant that looked to be the right size, and ‘eye-balled’ some pants, cutting out wide legs and room for the lion-sized bottom and the long tail.  Here’s my first effort.

Well, obvioiusly my first effort wouldn’t quite fit up over Mr. Lion’s bottom, and had no tail access.  So, I cut a 3″ waistband band that would go all the way around, attached it to the top of the pants, and then folded the band over and sewed it down to the base, leaving a 3″ opening at the back.  Then I strung some elastic through to each end of the waistband (leaving the 3″ opening). After securing the elastic on both ends, I sewed a narrow 2″ strip of fabric to ‘connect the waistband so that it left a place for the tail to go through.  As my young grandson would say, Ta-Da!!!!

Here are some pictures of the finished product.

And best of all, Sweet said it made her very happy!   That’s what I was going for, so ….. Ta-Da!!

Red, White & Blue Cake Pops

I’ve never been one to make special event-inspired desserts, but I saw this great 4th of July ‘cake’ that I’m going to try this year.  Party City  has a list of “10 Sweet 4th of July Party Ideas”, and THIS one caught my attention.

Party City Cake Pops

It might be because this delectible, yummy creation is red, white and blue, or it might be because it’s a perfect treat for kids,  but more likely it’s because I received a Cake Pop and Donut Hole Maker for Mothers Day  and now I can use it to make something really fun!  Something the family will really like – something the grandkids will think is ‘cool’

Bella Cucina Machine

I’ll keep you posted how the cake pops turn out!!

Family Additions

Shortly before we left Oregon, we decided to adopt!  A DOG!!!  Our beloved Quincy, a German Shepard/Lab mix, had passed on, and our house felt empty.  He was such a sweetie!

Unlike my BFF, I don’t go to the Humane Society  just to visit – I can’t walk in there without wanting to bring all the cats and dogs home, and it makes my heart hurt having to leave them behind. Regardless, my husband and I went down looking for a medium size dog that would be a good traveler and fit in our 5th wheel.  Instead, when I walked in, I found a wire-haired Dachshund who looked up at me with huge brown eyes, barked and wimpered, and my heart melted.

So, after a walk in the park with him to make sure we agreed we all liked each other, we brought home a small (12 lb), old (12 yrs old), toothless (well, almost), set-in-his-ways little pooch.

Boris - leaving the Willamette Humane Society

Taking Boris Home from Willamette Humane Society

Definitely not what I had expected – he’s not very playful, can’t get in and out of the 5th wheel by himself, and definitely not medium sized!

BUT – he’s a sweetheart and sure has made himself at home!  When we travel (anywhere) he insists on riding on my lap, but at home he’s a pillow-on-the-floor dog, and sometimes the couch.

Boris comfy as can be! 

He’s not much of an outdoor dog; if he stays out 10-15 minutes that’s an outing for him!  Bark!  He’s back at the door wanting in!

Oh well, he’s family now!  And family puts up with anything and everything! Boris

If you are looking for a new ‘forever’ friend, be sure to check out your local Humane Society – click the link to find one in your locale.

Moving to Texas!!!

On November 1, 2011, my husband and I drove down I-5 leaving Oregon and headed for our new life in San Antonio, Texas.  Although my husband had lived in other states before we married (36 years ago), I’ve never lived anywhere but Oregon, and never more than 15 miles from my birth place.

After a brief stop in Sacramento to visit with our daughter, and my husband’s family, we headed south pulling our 38′  home-on-wheels along behind us.  It was our plan to live in the 5th wheel for an ‘indefinite period’, possibly several years.

So, we arrived in Texas and set up camp at the Braunig Lake RV Resort just south of San Antonio, and only 5 miles from our son’s house.

 It has a beautiful pond and we had the perfect space to watch the setting sun.

Pond at Braunig Lake RV Resort
The location was perfect, and allowed us to spend lots of time with our daughter-in-law  and our grandkids while our son travels for his job.  And, they were able to come enjoy the lake, fishing and playing with the ducks!
Fishing at Braunig Lake RV Resort
Before long, the 5th wheel started feeling pretty cramped!!  I set up my sewing corner so that I could continue sewing for She and Me Designs, my DIL’s and my Etsy store.  Fabric and projects all over the place, and little space for relaxing.  Thankfully I have a very patient husband!

Regardless of all that, we enjoyed ourselves tremendously.  We spent lots of time with our grandchildren which was the reason we made the move, so we were ready to put up with anything!

Until the winter thunderstorms started!!!!!!!!!!

I’m NOT a fan of thunder of any magnitude, but had never experienced anything like what they have in Texas!!  Living in a 5th wheel, with the thunder blasting within inches of our heads, was more than I wanted to put up with – and it seemed like a thunder storm was coming through every week!  So we (I) decided it was time to find a real home.  Within a few short days we’d found a home to rent with a LOT of space, plenty for the grandkids AND a special craft/sewing room.      More on all that later!

Finally, we are truly settled!